How to Inspect Your Towable RV Axles, Brakes & Suspension
Keeping your RV safe and road-ready starts with a simple inspection. You don’t need to be a certified technician to catch early warning signs. A quick check of your RV axles, RV brakes, and RV suspension can help prevent costly repairs and keep every trip on track.
For great technical details and safety tips, please check out Dexter’s Light Duty Axle Service Manual
Click Here For a Printable RV Maintenance Checklist!
Safety First
Before you begin your inspection:
- Park your trailer on a solid and level surface, like a concrete slab.
- Chock your trailer wheels
- If you plan to be under your trailer while it is connected to a tow vehicle, set the tow vehicle parking brake, place chocks, put a warning tag on the steering wheel, and then lock the doors of the tow vehicle and secure the tow vehicle keys from others before going under the trailer.
.png)
- It should not be necessary to jack the RV up for a quick visual inspection. However, if you choose to raise the RV off the ground for your inspection, always securely place its frame on at least two jack stands, one on each side of where you will be working. Never crawl under an RV supported only by a jack
- Wear gloves and eye protection if you’re getting hands-on. If anything feels unsafe, stop and call a professional.
While inspecting, pay special attention to the right (curb) side of the trailer, and pay even more attention to the axle, chassis and brakes on the right front side. Statistically, the right front meets the most potholes, curbs, ditches, mailboxes, etc.
Step-by-Step Inspection
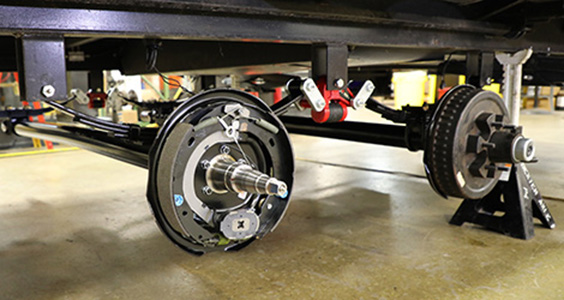
Step 1: Inspect Your RV Axles
Your RV axle system carries the load and gets you where you want to go.
- Check the axle tube for dents or scraped paint from impacts. A slight upward bow (camber) is normal, but any forward or rearward bend can indicate misalignment.
- On tandem or triple axle trailers, measure the distance between axle hubs on both sides. The left and right measurements should be within 1/4 inch. Larger differences may indicate uneven loading or structural issues.
- Inspect the back of hubs and brakes. They should be dry. Any grease or fluid suggests a leak that needs repair.
- What to watch for: uneven tire wear, a leaning trailer, or anything that clearly looks out of line.
Step 2: Check Your RV Brakes
Your RV brakes are critical for safe stopping.
- Most towable RVs use electric drum brakes. Check that both wires entering each brake are secure and not hanging loose.
- Some trailers have forward self-adjusting brakes (Nev-R-Adjust® / FSA), while standard electric brakes require adjustment about every 3,000 miles or at least once per season. If unsure, verify using your axle serial number. Check your axle and contact Dexter if you need support identifying what you have!
- To confirm electrical function, have someone activate the brake controller override at full gain while you listen near each drum. A soft “click” or hum indicates the magnets are working.
- For hydraulic or electric-over-hydraulic systems, check brake fluid levels. Low fluid may indicate a leak. No fluid means the brakes are inoperable and require immediate repair.
- Listen for any grinding, squealing, or unusual noises when stopping.
- Notice if the RV pulls to one side when braking
- Check for delayed or weak braking response
- Inspect for uneven or abnormal temperature on brakes
If you have access and experience, inspect brake components for wear. If not, a qualified service shop can perform a brake inspection relatively quickly.
What to watch for: changes in stopping distance or brake performance.
Step 3: Examine Your RV Suspension
Your RV suspension system helps absorb road impact and maintain stability.
- Look at each frame hanger (where the spring and equalizer bolts are), for visible cracks, rust trails from fasteners, worn holes, or bent components.
- Look at each of the leaf springs for cracks, flattening, or leaf separation
- Check spring shackles, hangers, and bolts for looseness or wear
- Inspect spring eye and equalizer bushings for deterioration
- If your suspension has shock absorbers, check their mounts for wear, and each shock for any dents or leaking hydraulic fluid.
- If you have a torque wrench, check the tightness of your u-bolt nuts and shackle nuts per the torque specifications in the light duty axle service manual.
What to watch for: trailer tending to pull towards one side, leaning to one side, uneven ride height, or clunking sounds.
Step 4: Check Your Tires for Clues
Tires often reveal what’s happening underneath.
- Look for uneven tread wear
- Check for bald spots, cracks, or bulges in the tires
- Confirm proper tire pressure
- Check the date code on all the tires. Any tire over five years old is a good candidate for replacement, regardless of wear.
- Check for missing or loose lug nuts. Rust trails beneath a nut may indicate it is or was loose.
- If you have a torque wrench, verify lug nut tightness using the manufacturer’s specifications.
What to watch for: Tire wear patterns that may indicate axle alignment or suspension issues.
When to Get Professional Help
Some things are best left to the experts. Schedule service if:
- You notice vibrations, tracking[NM1] , or unusual handling
- There is visible damage to axles, brakes, or suspension components
- Your RV has been in storage for an extended period
- You’re preparing for a long trip and want confidence on the road
For service professionals, a thorough inspection should include verifying brake wear tolerances, confirming proper torque on suspension hardware, annual bearing inspection and service, and checking axle alignment and load capacity.
Why Regular RV Inspections Matter
Routine checks of your RV running gear help:
- Prevent breakdowns
- Extend component life
- Improve towing stability and safety
- Reduce long-term maintenance costs
A few minutes before a trip can make a big difference down the road.
Look for Dexter When You Buy
When it comes to the components underneath your RV, quality matters.
Dexter builds trusted RV axles, trailer brakes, and suspension systems designed for durability and performance. Whether you’re purchasing a new RV or replacing key components, look for Dexter to ensure you’re backed by proven reliability.
Final Thoughts
A simple walk-around. A few quick checks. That’s all it takes to stay ahead of potential issues.
If something doesn’t look or feel right, trust your instincts and get it checked out. And when you’re ready to upgrade or replace components, make sure you have the Dexter brand underneath.
Safe travels.
Jump to Top